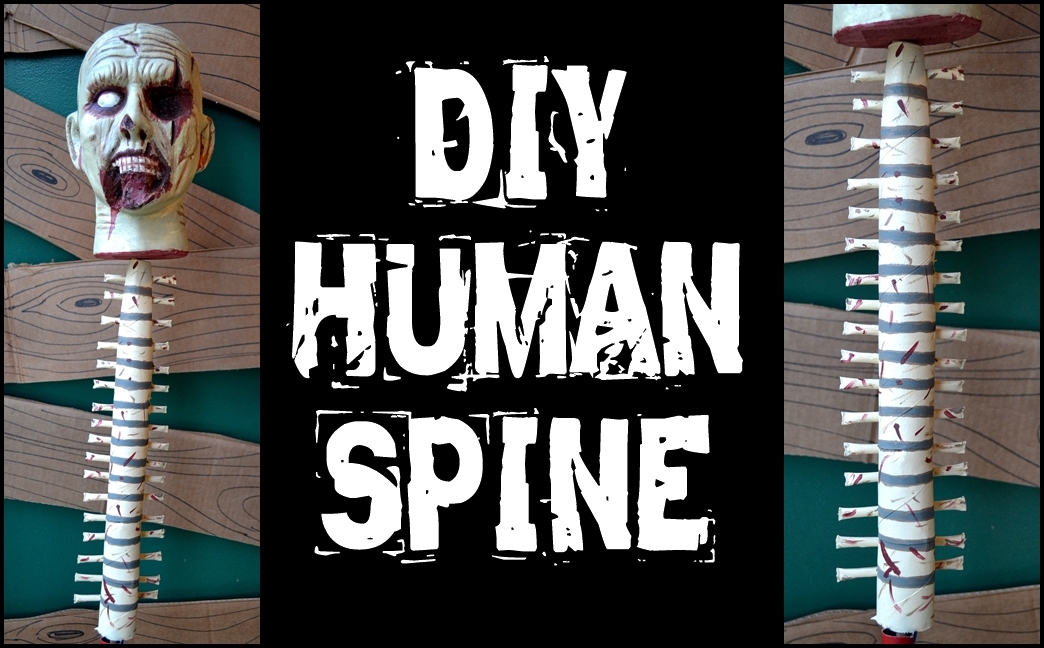
DIY Human Spine
Make Your Own DIY Human Spine
DIY human spine for zombies, ghouls and ghosts everywhere. You can easily make this prop using things you have around your home. The base of the spine is cardboard tubes (paper towel or toilet paper) and plastic straws. Easy to make in just a few hours.
This post contains affiliate links which means if you click a link and make a purchase, we may receive a small commission at now additional cost to you. Thank you for supporting us!

Supplies
- Cardboard tubes (2-4 depending on size)
- Plastic straws
- Xacto knife
- Hot glue gun
- Scissors
- Lighter
- Needle nose pliers
- Paints (of your choice, we used acrylic craft paint)

Start by making a slight crease in the top of your first tube in order to make the top a little smaller than the rest. Using an xacto knife cut small slits (see photo for placement) on either side and push straws through these slits. Your crease should mostly be held in place – you can glue it later. You may need to wiggle the knife back and forth a little to make the hole wide enough to push the flattened straw through.

Next, mark where you’d like the rest of your straws to go along the back of the tube. On a real human spine they are closer together at the top and wider at the bottom, but I mostly just tried to keep them spaced enough so I wouldn’t rip through from one hole to the next.

To attach two tubes together, pinch one slightly at the top and insert it into the other about 1-2 inches, or far enough so that one of the straws you push through can go through both. This will secure them together. I did not glue mine and they haven’t come apart, but you couldn’t definitely throw some hot glue in there if you’d like. Pushing the straw through two tubes is not the easiest. Wiggle the hole a little bigger than the others. If you still can’t get it through, put a small paintbrush or skewer inside the straw to make it more stable and able to be pushed through the hole.

Next, secure your spine parts in place with hot glue. Just a line of glue along the back is plenty. Using a glass to hold the spine while gluing is recommended, as pictured. At this time you can also hot glue together the crease at the top and the separate tubes if you wish.

Once your glue is dry on your spine (which doesn’t take long at all) use your scissors to cut off the straws at desired length. I left mine a little long because we are using it for a porch display. I wanted it to be easy to tell what it was from far away, but they definitely could have been shorter.


Up next is the fun part, which honestly I didn’t even do, Jamie did it, but it still looked like fun. Using a lighter and needle nose pliers, you will need to close the ends of each straw. Do this by holding the lighter at the straw end for just a few seconds, until just the edge starts to melt. Immediately close the straw end in the pliers to seal the end. It should cool quickly. Use the glass again as a stand for the spine while you’re working on it.

This is how the spine should look from the back when you’re done closing the ends.
And that’s it! You now have a brand new cardboard human spine that is ready for paint. We used regular acrylic craft paint. A lot of base coats of a marshmallow cream color followed by gray stripes with brown detail and a little blood because mine is a zombie spine.
If you want a zombie head to go along with your spine, check out our easy zombie head painting tutorial.

We want to see what you made! Connect with us @unicornhideout on Instagram and Facebook.
Need more DIY ideas? Click here.

Click below for a quick and easy zombie head painting tutorial.

Related Post
DIY Bath Bombs Video | I Tried Making DIY Bath Bombs At Home
DIY Bath Bombs Video. Come on this journey with me as I make my first [...]
White Christmas Shot – Twelve Shots of Christmas Day Twelve
White Christmas Shot is the twelfth and final shot of our Twelve Shots of Christmas [...]