DIY Bath Bombs Video | I Tried Making DIY Bath Bombs At Home
DIY Bath Bombs Video. Come on this journey with me as I make my first ever DIY bath bombs. I have never made bath bombs or any other beauty product before. I did very little research (I read 4-5 recipes/tutorial on Pinterest) then just went ahead and tried it. Because what else is the internet (and Pinterest) for if not to make us feel like we can do any and all DIYs at-home with ease.
This post contains affiliate links, which means if you click a link and make a purchase, we may make a small commission at no additional cost to you. Thank you for supporting this blog!
The tutorial I used (I keep wanting to say recipe but that’s not quite right, is it?) kept popping up on Pinterest – DIY Bath Bombs from The Beauty Bar. It’s a DIY from 2015. It was a slightly larger batch than most of the other DIYs, so I went with it. I figured more bang for my buck plus who knows if I’ll take the time to get all this shit together again.

How To Basics
So that the rest of what I say makes sense, here’s a basic how-to explanation of this particular bath bomb DIY.
- Mix together the three dry ingredients: citric acid, baking soda, & cornstarch.
- Mix together the two wet ingredients: melted coconut oil & essential oil.
- A little at a time (very little), mix the wet ingredients into the dry ingredients.
- Pack into molds and let dry for 24 hours.

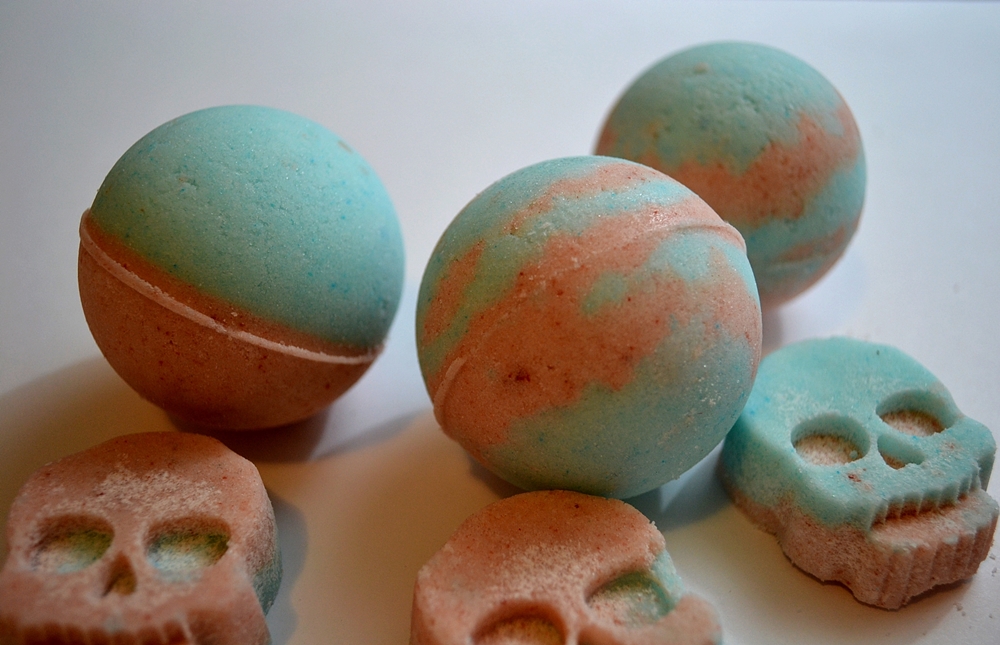
Molds
I used the molds below. The Christmas ornaments worked great for traditional round bath bombs. The teeth are probably my favorite. The skulls are maybe a little small and the guns were pretty fragile.
 |
 |
|---|---|
 |
 |
Tips & Tricks
First off, probably find a different tutorial for making your bath bombs unless you have extremely dry skin and/or don’t mind cleaning your tub thoroughly after every bath bomb use. I almost slipped and fell in the tub the next morning because I thought surely the layer of oil on the bottom of the tub wouldn’t be THAT slick. (I was wrong.) BUT – Jamie has ridiculous dry skin and after she used this bath bomb, her skin was the least dry I’ve ever seen. So we may still use this version for her, but I’d like to try some others.

I would not say this was difficult, but damn it was tedious. I am not a patient person so I have no idea how I did it. Probably fear of it not working and my time being wasted (I’m very fear motivated) caused me to take my time with the two parts of the process that take the longest –
- Mixing the wet ingredients with the dry ingredients. I did this by mixing in TWO TEASPOONS at a time for a whole 1/2 cup of liquid. Not fun. BUT it didn’t react and clump together weird, so I feel all right about it. Definitely do not jump the gun on this step, take your sweet ass time. Other tutorials use less liquid so it may not be as bad. But either way, if you mix it together too fast, the mixture isn’t the right texture. Also, just use your hands from the start like every tutorial says – it got much faster once I did this. USE OF GLOVES HIGHLY RECOMMENDED and I really don’t care about getting my hands gross so that’s saying something.
- Packing the stuff into the molds was also something I took my time with. This I feel was also necessary – everything was packed in tightly and came out of the molds great, with the exception of one gun which broke. The few small places where I hadn’t packed it in tight enough crumbled. I would stick with larger molds – the guns were a little too small.

Ingredients
The one weird ingredient is citric acid. If you are an extreme beginner, like me, I would recommend buying a small shaker of citric acid from the canning section of any store that has a canning section. I got a 7.5 oz bottle ($3 at Walmart, price subject to change) and it was exactly 1 cup. For this tutorial, that will cover one batch. A lot of the other tutorials use 1/2 cup so you’ll have enough for two batches in that case. As a beginner, get the small bottle so you don’t have a giant bag of citric acid lying around that you’ll never use again. Then if you fall in love with making bath bombs, get a bigger bag next time.
Also regarding ingredients – the dry ingredients threw up so much powder I thought I was going to need a dust mask. Watch the video, you can see it’s so thick I blow across the bowl and the cloud of dust moves. Honestly, if I try it again, I may put the dry ingredients in a gallon zip lock bag and shake them up for the first mix step. It was pretty ridiculous.

But Do They Work?
Yes! At the end of the video we throw some broken pieces in the tub and they bubble up nicely. They do not last as long as other bath bombs I’ve used and they also don’t color the water, at least with the small amount of food coloring I used (2-4 drops per color). Jamie took a bath with one a few days later and she really liked it. They are super moisturizing because of the coconut oil. Again, a huge word of caution – you will have to clean oil out of your tub after each use. The oil left residue and made the tub slick. I forgot the next morning and nearly fell.

And last but not least, check out the video here!
Again, here is the link to the tutorial I used: DIY Bath Bombs from The Beauty Bar.
Have you made your own bath bombs? Connect with us on social media and let us know how it went! @unicornhideout on Instagram and Facebook.
Need more DIY ideas? Click here!
Click here for some of our other videos or subscribe to our brand new channel on YouTube!

Related Post
First Time Camping Video
My first time camping happened in April. Jamie insisted it would be a good trip [...]
DIY Human Organ Cooler | Free Printable Stencil
This DIY Human Organ Cooler will be a fun accessory to take to your next [...]