Pizza Face Amigurumi | Free Crochet Pattern
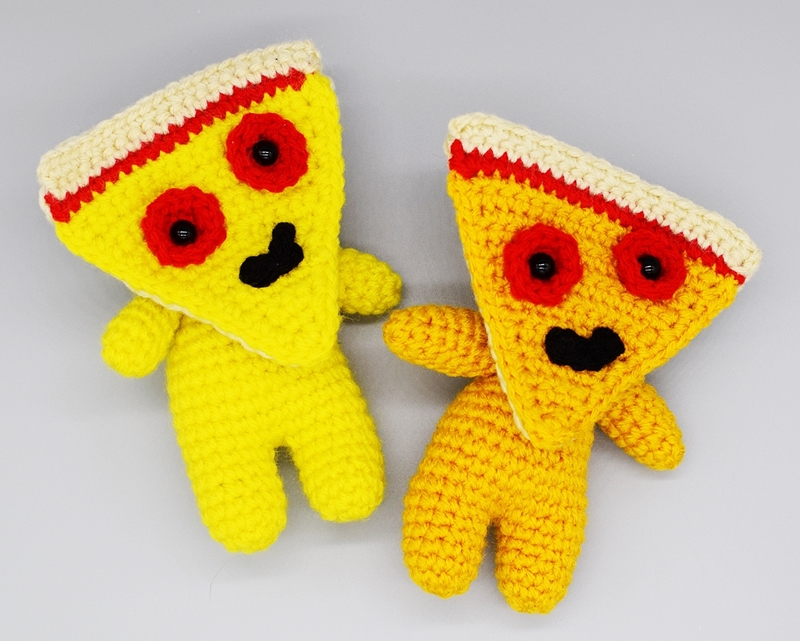
PIZZA FACE AMIGURUMI CROCHET PATTERN
Pattern by Carly Arnold of UnicornHideout.com

For a PDF pattern with lots of detailed photos to guide you through making your little pizza face crochet doll, check out the links below! Pattern is available on both Ravelry and Etsy.
buy now on Ravelry
buy now on Etsy
This post contains affiliate links, this means if you click a link and make a purchase we may receive a small commission at no additional cost to you. Thank you for supporting small makers!
SUPPLIES
3.75mm (F) hook
Polyfil
Yarn needle
Two safety eyes
4 medium worsted weight yarn, you will need a small amount in the following colors:
Cheese color – yellow or gold
Sauce color – red or maroon
Crust color – beige or tan
Olive color – black
This amigurumi doll is worked in the round without joining each round. The pizza slice is made in rows. The body, arms, pizza slice, and face are all made separately and sewn together using a yarn needle.
ABBREVIATIONS
st = stitch
sc = single crochet
dc = double crochet
ch = chain
sl st = slip stitch
inc = increase (work two single crochet in one stitch)
dec = decrease (2 single crochet together)
[…] = repeat instructions in brackets the indicated number of times
(…) = number of stitches in that row.

LET’S CROCHET!
LEGS (make 2)
Cheese color yarn.
Rnd 1. sc 6 in magic ring (6)
Rnd 2. inc in next 6 st. (12)
Rnd 3-6. sc around (12)
First leg – cut yarn and fasten off.
Second leg – do not cut yarn. These two legs will be attached in the next step.
BODY & HEAD
This will be worked off the two legs.
Continue with the second leg.
Rnd 1. (This round will connect the two legs) Ch 2, sc into any stitch on the first leg, sc 12 st around first leg, sc 2 into beginning chain, sc 12 around second leg (28) stuff legs now or after the next few rows.
Rnd 2-7.sc around (28)
Rnd 8. [sc 5, dec] 4 times (24)
Rnd 9. [sc 2, dec] 6 times (18)
Rnd 10. 18 sc (18)
Rnd 11. [sc 1, dec] 6 times (12)
Rnd 12. [dec] 6 times (6) stuff the rest of the body
Rnd 13. [inc] 6 times (12)
Rnd 14. [sc 1, inc] 6 times (18)
Rnd 15. [sc 2, inc] 6 times (24)
Rnd 16-18. sc 24 (24)
Rnd 19. [sc 2, dec] 6 times (18)
Rnd 20. [sc 1, dec] 6 times (12)
Rnd 21. [dec] 6 times (6)
Stuff and finish by closing hole at top of head. Tail will not be used for sewing, so stuff tails inside or weave in.
ARMS
Make 2.
Cheese color yarn.
Rnd 1. sc 6 in magic ring. (6)
Rnd 2. [sc 1, inc] (9)
Rnd 3-9. sc 9 (9)
Finish, tie off, and stuff. Leave a long tail for sewing.

For a PDF pattern with lots of detailed photos to guide you through making your little pizza face crochet doll, check out the links below! Pattern is available on both Ravelry and Etsy.
buy now on Ravelry
buy now on Etsy
PIZZA SLICE TOP
Cheese color yarn.
Worked in rows, with a chain 1 and turn at the end of each row. This chain will not count in the stitch count of the row.
Row 1. Ch 2, turn, sc 2 in second chain from hook, ch 1 & turn (2)
Row 2. Sc 1, inc, ch 1 & turn (3)
Row 3. Sc 2, inc, ch 1 & turn (4)
Row 4. Sc 3, inc, ch 1 & turn (5)
Row 5. Sc 4, inc, ch 1 & turn (6)
Row 6. Sc 5, inc, ch 1 & turn (7)
Row 7. Sc 6, inc, ch 1 & turn (8)
Row 8. Inc, sc 6, inc, ch 1 & turn (10)
Row 9. Inc, sc 8, inc, ch 1 & turn (12)
Row 10. Sc 11, inc, ch 1 & turn (13)
Row 11. Sc 12, inc, ch 1 & turn (14)
Row 12. Sc 13, inc, ch 1 & turn (15)
Row 13. Sc 14, inc, ch 1 & turn (16)
Row 14. Sc 15, inc, ch 1 & turn (17)
Row 15. Sc 16, inc, ch 1 & turn (18)
Row 16. Sc 17, inc, ch 1 & turn (19)
Turn the piece, and work a sc in each row along the edge of the piece, toward the point. At the point, [sc, dc, sc] into the point. Continue up the other side of the piece until you reach the top edge. Slip st into the first st on the top row.
Color change to sauce color.
Row 17. Back along the top edge. Sc 18, inc, ch 1 and turn (20)
Color change to crust color.
Row 18. Sc 19, inc, ch 1 and turn (21)
Row 19. Sc 20, inc (22)
Fasten off and cut yarn. Ends can be woven in, or you can hide them inside the two pizza pieces.
PIZZA SLICE BOTTOM (CRUST)
Crust color yarn.
Worked in rows, with a chain 1 and turn at the end of each row. This chain will not count in the stitch count of the row.
Row 1. Ch 2, turn, sc 2 in second chain from hook, ch 1 & turn (2)
Row 2. Sc 1, inc, ch 1 & turn (3)
Row 3. Sc 2, inc, ch 1 & turn (4)
Row 4. Sc 3, inc, ch 1 & turn (5)
Row 5. Sc 4, inc, ch 1 & turn (6)
Row 6. Sc 5, inc, ch 1 & turn (7)
Row 7. Sc 6, inc, ch 1 & turn (8)
Row 8. Inc, sc 6, inc, ch 1 & turn (10)
Row 9. Inc, sc 8, inc, ch 1 & turn (12)
Row 10. Sc 11, inc, ch 1 & turn (13)
Row 11. Sc 12, inc, ch 1 & turn (14)
Row 12. Sc 13, inc, ch 1 & turn (15)
Row 13. Sc 14, inc, ch 1 & turn (16)
Row 14. Sc 15, inc, ch 1 & turn (17)
Row 15. Sc 16, inc, ch 1 & turn (18)
Row 16. Sc 17, inc, ch 1 & turn (19)
Row 17. Sc 18, inc, ch 1 and turn (20)
Row 18. Sc 19, inc, ch 1 and turn (21)
Row 19. Sc 20, inc (22)
Turn the piece, and work a sc in each row along the edge of the piece, toward the point. At the point, [sc, dc, sc] into the point. Continue up the other side of the piece until you reach the top edge. Slip st into the first st on the top row.
Fasten off and leave tail very long – this tail will be used for sewing bottom to top pizza slice and for sewing the whole slice onto the head.
PEPPERONI EYES
Make 2.
Red yarn.
Rnd 1. sc 6 in magic ring. (6)
Rnd 2. [inc] 6 times (12)
Finish. Leave tail for sewing OR weave in ends and use the safety eye to secure pepperoni to the pizza slice.
BLACK OLIVE MOUTH
Black yarn.
Add or remove chains if needed for mouth depending on size of chains.
Chain 6, turn, slip st into each chain across starting in second chain from hook (5 sl st across)
Finish. Leave tail for sewing OR mouth can be glue on using fabric glue.

ASSEMBLY
Assemble in this order for best results!*
Attach arms to body.
Using long tail and yarn needle, pinch together and sew closed the top of each arm. Position arms as desired on the body and sew on across the top. If it helps, use a stitch marker or small pin to hold the arms in place while working. My arms are positioned at the top of the body, just under the head, to create shoulders.
Create face on top of pizza slice.
Sew on pepperoni slice using tails, then attach safety eyes in the middle of each OR just use the safety eye to secure the pepperoni to the slice. Sew or glue on olive mouth.
My positioning of the face – left eye: middle is five rows from the top of the yellow. Right eye: middle is three rows down from top of the yellow. Mouth is around six rows up from the point.
Sew together top and bottom of pizza.
Using long tail from the bottom pizza piece, sew the top and bottom together. I sewed into the back of the top slice so the stitching would not be visible on the front. When finished, do not cut off tail – weave it through the slice so it is in position to sew the slice onto the head, around five rows from top and in the center.
Sew pizza slice to front of face.
Using tail, sew pizza slice onto the front of the head.

*If you are new to amigurumi, assembly can be tough! Here are some tutorials from other websites to help you through.
For attaching open pieces (like the head and body) – https://www.lilleliis.com/how-to-join-amigurumi-pieces
For attaching closed pieces (like the arms to the body) –
https://www.shinyhappyworld.com/2012/06/hate-attaching-limbs-to-amigurumi-not-after-reading-this-post
For a PDF pattern with lots of detailed photos to guide you through making your little pizza face crochet doll, check out the links below! Pattern is available on both Ravelry and Etsy.
buy now on Ravelry
buy now on Etsy
We would love to see how your Pizza Face turns out! Tag @unicornhideout on Instagram or Facebook.
Looking for more free crochet patterns? Click here.
Copyright 2021 Carly Arnold, UnicornHideout.com
PATTERN DISCLAIMER
You are allowed to sell products made from this pattern but please clearly credit the design to me, Carly Arnold of Unicorn Hideout, and provide a link to the website www.unicornhideout.com. If you wish to sell your own products made from this pattern, you are not permitted to use, in part or full, any descriptions or photos from this pattern. Photos from unicornhideout.com are not permitted for use on any website, social media or pattern roundup page. If you would like to share a photo and link to this pattern, please email me at unicornhideout@gmail.com for permission. Please do not sell, distribute, duplicate, or share these patterns or downloads in any printed or digital form, or claim patterns as your own original designs.
Related Post
Demiromantic Pride Flag | Free Crochet Pattern
Mini Demiromantic Pride Flag Free Crochet Pattern This demiromantic pride flag pattern is 13 of [...]
Genderfluid Pride Flag | Free Crochet Pattern
Mini Genderfluid Pride Flag Free Crochet Pattern This Genderfluid pride flag pattern is the eighth [...]